Learning how to tell if a camera lens is damaged is a crucial step in maintaining your photography gear in prime condition.
This guide will educate you on identifying common lens issues, understanding their impact on your imagery, and knowing when it’s time for a repair or replacement.
Stay tuned as we unravel the mysteries surrounding lens damages and how to diagnose them like a pro.
Key Takeaways
| Aspect | Inspection Method | Possible Indication of Damage |
|---|---|---|
| Visual | Check for scratches, scuffs, and fungus. | Lens surface or internal element issues. |
| Sharpness | Capture images at various apertures. | Blurry or unsharp images. |
| Autofocus | Test autofocus on different subjects. | Inconsistent or failing autofocus. |
| Vignetting | Capture images against a plain background. | Dark corners in images. |
| Chromatic Aberration | Capture high contrast scenes. | Color fringing around objects. |
1. Understanding the Basics of a Camera Lens
Before delving into the signs of lens damage, it’s essential to grasp the basics of how a camera lens operates.
A camera lens is a photographer’s medium to capture the world accurately and creatively. The lens’s quality directly impacts the image quality, making it imperative to ensure its well-functioning condition.
Anatomy of a Lens
A camera lens is a complex assembly of glass elements, each with a unique role in directing light onto the camera sensor.
The primary components include:
- Lens Elements: Glass or plastic pieces arranged in groups.
- Aperture: The opening through which light passes, adjustable to control the amount of light.
- Focus Ring: Adjusts the lens elements to sharpen the image.
- Zoom Ring (if applicable): Alters the focal length to zoom in or out.
The Importance of a Well-Functioning Lens in Photography
A well-functioning lens is crucial for capturing sharp, clear, and well-exposed photographs. Any damage or malfunction can significantly compromise image quality, making it imperative for photographers to regularly inspect and maintain their lenses.
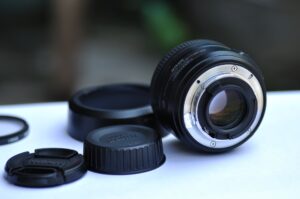
2. Visual Inspection: The First Line of Defense
A simple visual inspection can be the starting point in diagnosing possible lens issues. It’s a non-technical method that may reveal apparent signs of damage.
Scratches and Scuffs
Examine the lens glass for any scratches or scuffs.
Minor surface scratches might not significantly affect image quality, but deep scratches can cause noticeable flaws in your photos.
If you find any scratches, it might be worth reading our guide on can you fix a scratched camera lens.
Fungus, Haze, or Mold
Fungus and mold thrive in humid environments, and over time, they can etch into the lens elements, causing permanent damage.
Haze, on the other hand, is often due to lubricant evaporation inside the lens, which can also adversely affect image quality.
Our guide on how to clean fungus from a camera lens or why is my camera lens blurry may come in handy if you spot any of these issues.
Loose or Missing Parts
Inspect the exterior of the lens for any loose or missing screws, rings, or other components. Ensure that the focus and zoom rings turn smoothly without any grinding or sticking.
3. Testing Lens Sharpness
Ensuring that your lens is still capable of rendering sharp images is paramount. A loss in sharpness could be due to various issues, ranging from minor to severe lens damages.
Methods to Assess Sharpness
Here are a few steps to evaluate lens sharpness:
- Use a Tripod: Mount your camera on a tripod to eliminate any camera shake.
- Choose a Subject: Select a subject with fine details that will make any loss of sharpness apparent.
- Test Various Apertures: Take several shots at different apertures, especially at the lens’s widest and narrowest apertures.
- Review Images: Examine the images on a computer screen, zooming in to check for sharpness.
Impact of a Damaged Lens on Image Clarity
A damaged lens can cause various issues such as blurred images, loss of contrast, or even a complete lack of focus.
Understanding the how do camera lenses focus can help in diagnosing problems related to image clarity.
This section provides a foundational understanding of camera lenses and preliminary methods to inspect for possible damages.
In the following sections, we will explore deeper into more technical aspects of lens inspection, ensuring you have a comprehensive understanding of diagnosing lens issues.
4. Checking for Autofocus Issues
Autofocus (AF) is a vital feature that ensures your subjects are sharp and well-defined.
However, a damaged lens might exhibit problems with its autofocus functionality, which could be frustrating and detrimental to capturing those perfect moments.
Common Autofocus Problems
Some common autofocus issues include:
- Inconsistent Focus: The lens struggles to focus or focuses on the wrong part of the scene.
- Hunting: The lens continuously moves in and out of focus without locking onto the subject.
- No Focus: The lens fails to focus at all.
Should you encounter any of these problems, it might be an indication of damage affecting the lens’s autofocus mechanism.
Troubleshooting Autofocus
Here’s a step-by-step guide to troubleshooting autofocus issues:
- Check Your Camera Settings: Ensure that your camera settings are correct and compatible with your lens.
- Clean the Lens Contacts: Dirty lens contacts can impede communication between the lens and camera, affecting autofocus. Learn more about how to clean a camera lens properly to avoid this issue.
- Test Different Autofocus Modes: Switch between different autofocus modes to see if the problem persists.
- Manual Focus: Try manual focus to check if it’s an issue with the autofocus mechanism specifically.
5. Detecting Lens Vignetting
Lens vignetting is a common phenomenon where the corners of the image are darker than the center.
While some level of vignetting is normal, especially at wide apertures, excessive or unusual vignetting might indicate a problem with your lens.
Understanding Lens Vignetting
Vignetting can occur due to:
- Lens Design: Some vignetting is inherent in the lens design, especially in wide-angle lenses.
- Aperture Setting: Wide apertures like f/1.4 or f/2 often result in noticeable vignetting.
- Improper Lens Hood or Filters: Using incompatible lens hoods or filters can also cause vignetting.
Top tip: Reading our complete guide on why lenses vignette can provide more insight into this phenomenon.
Causes and Resolutions
| Cause of Vignetting | Resolution |
|---|---|
| Wide aperture setting | Stop down the lens (use a smaller aperture). |
| Unsuitable lens hood or filter | Use compatible accessories. |
| Lens misalignment or damage | Have the lens inspected by a professional. |
6. Inspecting for Chromatic Aberration
Chromatic aberration, also known as color fringing, is a common lens issue where colors are misaligned at the borders of contrasting areas in an image.
While some level of chromatic aberration is expected, especially in cheaper lenses, a sudden increase in color fringing might indicate lens damage.
Identifying Chromatic Aberration
Chromatic aberration is typically visible as red, green, or blue fringes around high-contrast edges in an image. It’s more pronounced at the edges of the frame and when using wide apertures.
Effects of Lens Damage on Color Fringing
Lens damage, like misalignment of lens elements or scratches, can exacerbate chromatic aberration.
It’s essential to compare your lens’s performance over time or against other lenses to see if the level of chromatic aberration is abnormal.
In the next section, we will further explore lens distortion, unusual lens noise, consistent lens flares, and when to seek professional lens evaluation.
Each of these aspects provides more clues on how to tell if a camera lens is damaged, ensuring you’re well-equipped to maintain your photography gear effectively.
7. Analyzing Lens Distortion
Learning how to tell if a camera lens is damaged often involves understanding the various forms of lens distortion.
Lens distortion alters the shape and size of objects in images, and while some level of distortion is expected due to lens design, sudden or severe distortion could indicate a problem with your lens.
Common Types of Lens Distortion
Here are some common types of lens distortion you might encounter:
- Barrel Distortion: Objects appear bulged outwards from the center.
- Pincushion Distortion: Objects appear pinched towards the center.
- Mustache Distortion: A combination of barrel and pincushion distortion.
Identifying Lens Distortion Due to Damage
Unusual or excessive distortion could be due to lens element misalignment or other forms of damage. If you notice any abrupt changes in distortion levels when using your lens, it’s worth investigating further.
8. Experiencing Unusual Lens Noise
Unusual noises from your lens, especially during focusing or zooming, can be concerning. These sounds can be indicators of internal problems.
Recognizing Abnormal Sounds
Listen for the following abnormal sounds when using your lens:
- Grinding or Scraping: May indicate misaligned or damaged lens elements.
- Clicking or Popping: Could be a sign of problems with the aperture mechanism.
Possible Damage Signified by Noise
If you’re experiencing unusual noises, it might be due to mechanical issues within the lens, and a professional evaluation is advisable.
9. Noticing Consistent Lens Flares
Lens flares are a commonly used effect in photography, but consistent, unusual lens flares could be indicative of lens damage.
Understanding Lens Flares
Lens flares occur when direct light hits the lens and scatters, creating streaks or circles of light in the image. While often used creatively, excessive or abnormal lens flares might indicate an issue.
Unusual Flares as Indicators of Damage
Check for abnormal lens flares by shooting towards a light source and reviewing the images for unexpected flares. Scratches, dust, or other lens issues could exacerbate lens flares.
10. Seeking Professional Lens Evaluation
If after all your personal evaluations, you’re still concerned about the condition of your lens, it might be time to consult a professional.
When to Consult a Professional
- Persistent Issues: If issues persist despite your efforts to diagnose and fix them.
- Severe Damage: Visible severe damage like deep scratches, dents, or loose elements.
- Unusual Behavior: Any unusual behavior not covered in this guide.
Benefits of Regular Lens Maintenance
Regular lens maintenance and professional evaluations will ensure your lens performs at its peak, extending its lifespan and ensuring top-notch image quality.
11. Preventive Measures for Lens Longevity
Prevention is always better than cure. Here are some preventive measures to ensure lens longevity:
- Proper Lens Storage: Learn about how to store camera lenses properly to prevent potential damage.
- Regular Cleaning: Keep your lens clean from dust, dirt, and fingerprints.
- Use Lens Caps: Always cover your lens with lens caps when not in use to protect it from scratches and dust.
Conclusion
This comprehensive guide should equip you with the necessary knowledge to discern how to tell if a camera lens is damaged.
Maintaining the pristine condition of your lens is pivotal in preserving the quality of your photographs and the longevity of your gear.
Keep a vigilant eye on your lens’ performance and condition, ensuring that any issue, no matter how minor, is promptly addressed.